
Fifty-three Stages of the Tokaido
Miya
Festival of the Atsuta Shrine
Hoeido edition, painting by Utagawa Hiroshige
The British Museum Collection
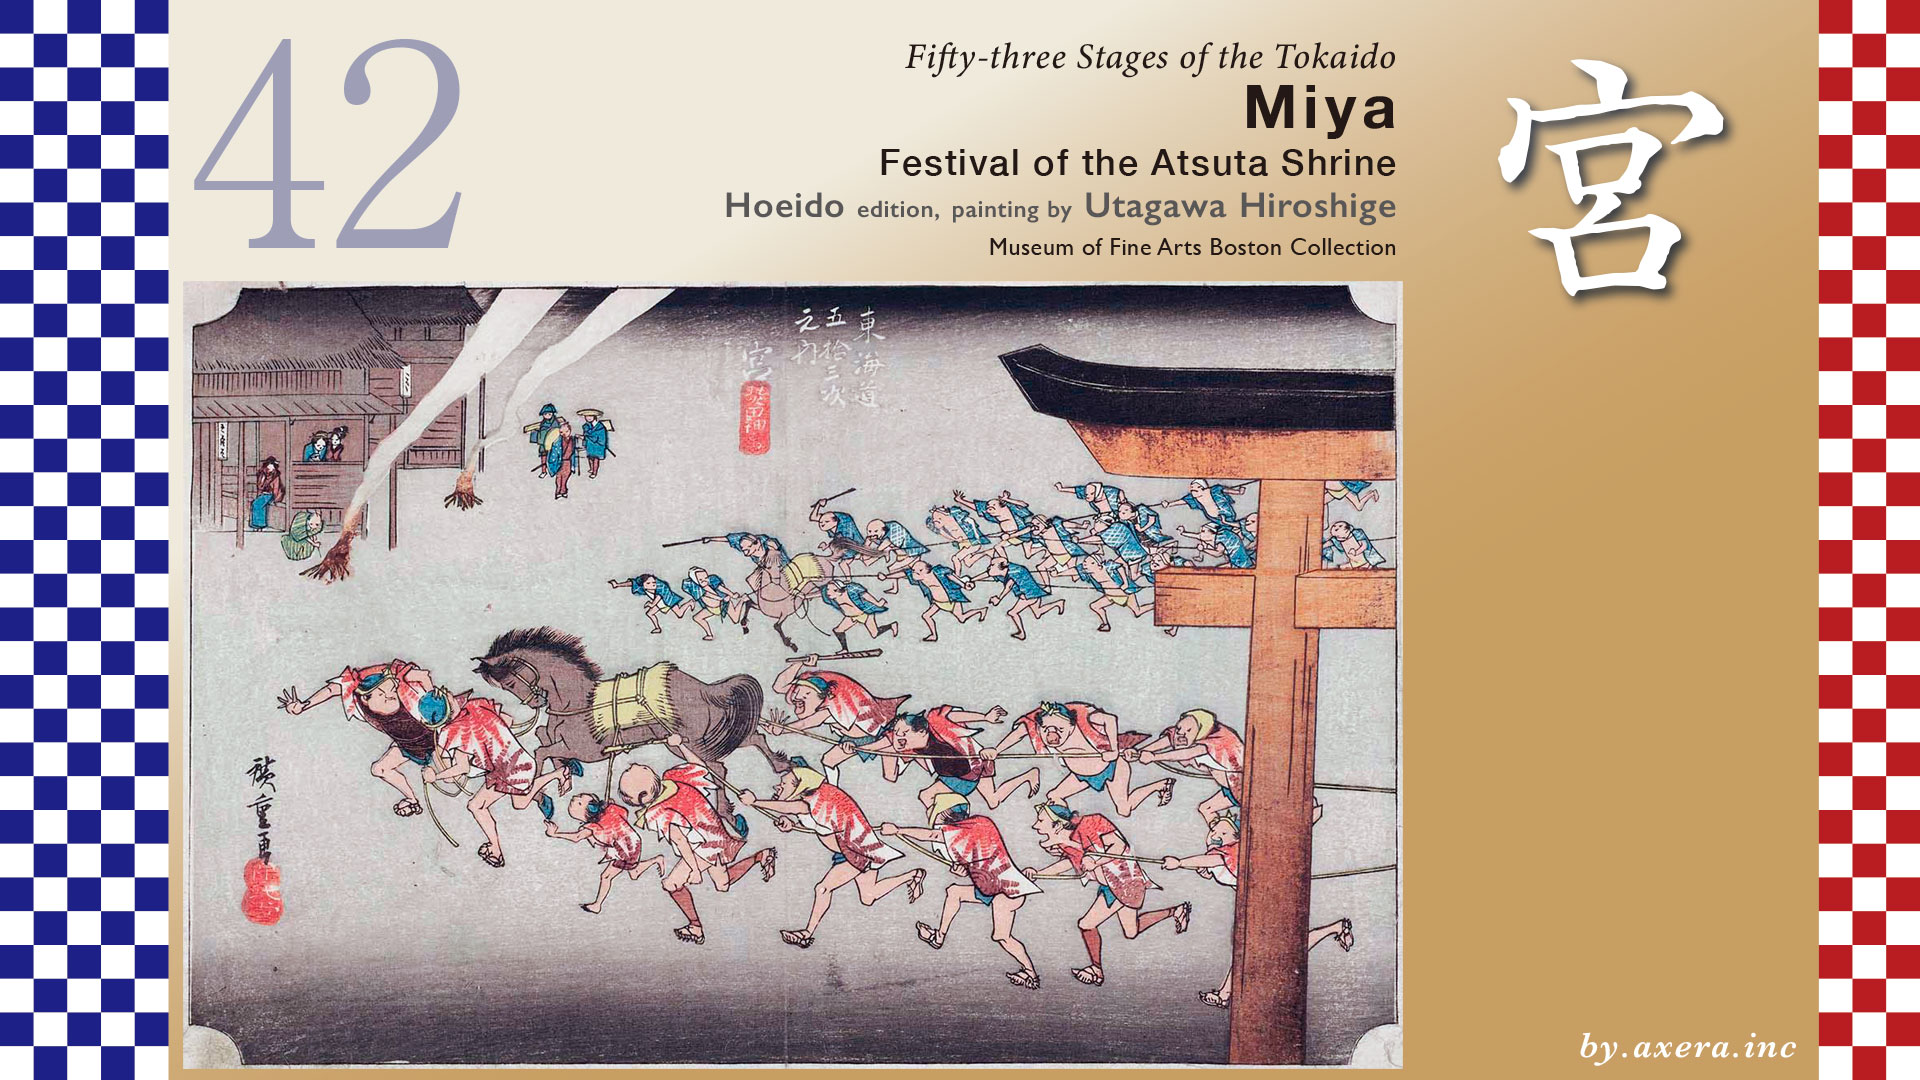
This work depicts the Shinto ritual known as Tango no Hashiriuma―the “Running Horses of the Fifth Month”―as it was performed in May at Atsuta Shrine, seen through the seaside torii gate known as the Hama-torii.
Let us begin by tracing the journey along the Tokaido Road.
The distance from Narumi-juku to Miya-juku is approximately six kilometers―a walk that even today takes about an hour and a half at a leisurely pace.
Leaving Narumi-juku and heading north, one arrives at Tange-cho. Here stands a stone lantern belonging to Akiha Shrine, marking what was once the official western boundary of Narumi-juku.
Crossing the Tenpaku River and turning slightly to the right, one encounters the Kasadera ichirizuka, a milestone mound that still survives in fine condition today.
Kasadera is well known for Kasadera Kannon, a temple with a history of some 1,300 years and close ties to Tokugawa Ieyasu.
From there, the Tokaido continues north alongside the Meitetsu railway line, crosses the Yamazaki River, and passes beneath the Nagoya Expressway at Matsuda Bridge.
Proceeding parallel to National Route 1, the road then crosses the Tokaido Line and the Meitetsu Tokoname Line, where the ichirizuka of Denma-cho appears on the right. This site, too, has been carefully restored and is accompanied by explanatory signage.
Eventually, the Tokaido comes to what appears to be a dead end.
Just before this point, on the right, once stood Kamichigama Shrine. Although it has since been relocated to Atsuta Shrine, it was long beloved by the local community and known for the New Year’s Ebisu festivities.
This junction also served as a oiwake, or crossroads.
Turning right leads past Atsuta Shrine and onto the Mino Road. The Mino Road branches off near Kanayama into the Saya-Kaido, continuing via the 3ri Ferry Crossing to Saya-juku, and further dividing near Nagoya Castle into the Kiso Road and the Zenkoji Road.
Turning left at the junction, one passes the site depicted by Utagawa Hiroshige and, in less than a kilometer, arrives at the port of the 7ri Ferry Crossing.
In the Edo period, this was an important ferry terminal for crossing the sea. Today, the area has been converted into a park, where a stone lantern and a time bell have been reconstructed. The Hama-torii gate depicted by Hiroshige, however, no longer exists.
In fact, there are three sources believed to have informed Hiroshige’s depiction of this scene.
The first is the Tokaido Meisho Zue, which presents a wide view extending from the 7ri Ferry Crossing to Atsuta Shrine. The torii gate visible in the lower right is the Hama-torii gate.
If we overlay the route of the ritual with a yellow dashed line and Hiroshige’s viewpoint with a red gradient, the composition becomes clearer.
The second source is the Owari Meisho Zue, which shows a closer, seaward view of the 7ri Ferry Crossing.
Applying the same overlays here makes the spatial relationship even easier to understand.
The third is the illustration titled “Tango Uma no Tou” from volume three of the Owari Meisho Zue.
This depicts a festival known as Uma no Tou, or the Horse-Chasing Festival, practiced in the Owari and Mikawa regions. At Atsuta Shrine, it was held on the Fifth Day Festival, where the powerful galloping of horses was offered in prayer for rain, communal safety, and a bountiful harvest.
Let us now return to the map to examine the actual geography.
The present-day shoreline differs greatly from that of the Edo period, so historical materials have been used to reconstruct the former waterscape.
The green rectangle in the water indicates the East Hama Palace, the green circle marks the West Hama Palace, and the light-blue circle shows the position of the Hama-torii gate.
Hiroshige’s viewpoint is indicated by a red gradient.
The yellow circle denotes the location of the honjin.
This area functioned as the temple town of Atsuta Shrine and a major hub for pilgrims traveling to Ise. By 1843, Miya-juku contained 250 establishments including honjin, waki-honjin, and lodging houses, with some 3,000 households and a population exceeding 10,000―making it one of the largest post towns along the Tokaido.
With this map in mind, let us examine Hiroshige’s print more closely.
In front of the torii gate, two groups of men run vigorously, wearing matching festival coats as they chase a bare horse.
This ritual, known as Omantou, was originally offered by individual villages, but every ten years several villages gathered to perform it jointly―an event known as gasshuku. It is believed that Hiroshige depicted such an occasion.
The horse is wrapped in coarse straw matting, while the men, gripping ropes with intense focus, pull it toward the shrine.
In the left background, celebratory bonfires can be seen lit throughout the area.
However, the space beneath the torii gate was considered the path of the deity, and ordinary people were strictly forbidden from passing through it.
When compared with the enlarged illustration of “Tango Uma no Tou” from the Owari Meisho Zue, it becomes clear that Hiroshige closely observed and faithfully reproduced the details of this ritual.
The print used here is not a first edition.
In many first impressions, the vermilion of the torii gate has oxidized and darkened, so a copy with the best remaining color was selected.
Looking at impressions closer to the first edition, one notices that the Hama-torii gate in this print curves upward, whereas in reality it was a Shinmei-style torii gate, which has no curvature.
In the Reisho edition, the torii gate is corrected to the Shinmei style, and the entire harbor is shown in a panoramic view.
The 7ri Ferry Crossing lies in the distance, the East Hama Palace in the foreground, and the famed scenic spot “Nezame no Sato” to the left.
The Gyosho edition presents a view of the sea through the Hama-torii gate.
The East Hama Palace appears on the left, and Nezame no Sato on the right, with the torii gate clearly shown without curvature.
The Poem edition also depict the Hama-torii gate. In these, travelers are shown passing beside the gate rather than beneath it.
Records from 1839 note that a follower of the Nichiren sect was punished for passing under the torii gete during a funeral, underscoring the strict sanctity associated with the gate.
Photographs from around 1918 reveal that the area surrounding the Hama-torii gete was not an open plaza, and that the top beam of the torii was pentagonal rather than round.
If its orientation had remained unchanged since the late Edo period, it suggests that Hiroshige may have significantly misjudged both its direction and the surrounding landscape.
A visit to the site today reveals a quiet streetscape. The Hama-torii gate and the waterfront have both disappeared.
Seen from a point slightly closer to the sea, and using 1918 photographs as reference, the Hama-torii likely stood behind the blue building visible here, with the East Hama Palace projecting seaward to its right.
The East and West Hama Palaces were originally constructed as castles, later serving as lodgings and reception facilities for feudal lords. According to historical records, the West Palace covered about 1,300 tsubo, while the East Palace extended to roughly 3,300 tsubo.
This photograph, taken from near the ferry landing, looks eastward. The East Hama Palace appears like an artificial island, with the scenic spot known as “Nezame no Sato” thought to have been located to its right.
The present view from the 7ri Ferry landing toward the sea shows shallow waters to the left, while the right side would have been almost entirely submerged at high tide.
Hiroshige is believed to have accompanied the “Hassaku Ouma Shinken” procession at the age of 36, but it is likely that he did not use the 7ri Ferry Crossing, instead traveling via the Saya Kaido and the 3ri Ferry Crossing.
This map overlays the routes of the 7ri and 3ri ferry crossings onto a modern map, combined with reconstructed Edo-period shorelines.
The likely reasons the procession chose the 3ri ferry Crossing include inaccuracies in Hiroshige’s depiction, as well as the considerable risk involved in transporting horses destined for imperial presentation across more than 7ri ferry of open sea.
Using Google Street View, Hiroshige’s viewpoint is approximated from a slightly elevated perspective, with the Tokaido highlighted in orange and the East and West Hama Palaces added.
A tentative location of the Hama-torii gate has also been inserted. Although the East Hama Palace was once surrounded by waterways, their traces are no longer discernible today.
Finally, looking from above the area near Atsuta Shrine, the Tokaido approaches from the left, where travelers would board boats at the 7ri Ferry Crossing and head across the sea toward Kuwana-juku.
At high tide in the Edo period, much of this area would have been inundated, forming a vast tidal flat into which the sea extended deeply inland.

コメント